August 29, 2022
I’ve had so much fun creating a Mac version of Library Notes in Catalyst that I’ve started a couple of other multi-platform projects. Along the way I’ve encountered some bugs and come up with at least one workaround that I will now share with you, Gentle Reader.
Developing for the Mac: So many choices
If you’re an iOS engineer, like me, venturing into Mac land for the first time, be aware that there are at least three ways to make this journey without going full AppKit.
- SwiftUI targeting the Mac SDK: In this mode, you write SwiftUI code, and under the hood that SwiftUI code will create native Mac (AppKit) controls. This route works if your UI is 100% SwiftUI. You don’t get the escape route of creating a
UIViewRepresentableto manage aUIViewwith SwiftUI, because your app doesn’t have access to UIKit at all. - SwiftUI targeting Mac Catalyst, “optimize for Mac” mode: In this mode, you’re writing SwiftUI, but under the hood your app is using the iOS SDK and will use Mac Catalyst to run on the Mac. Catalyst will try to make your UI controls look more Mac-like.
- SwiftUI targeting Mac Catalyst, “scaled to match iPad” mode: In this mode, you’re writing SwiftUI, it uses the iOS SDK, it uses Mac Catalyst to run on the mac, but the controls will look like iOS controls. (This is most noticeable with buttons and navigation bars.)
- UIKit, not SwiftUI, with the different Catalyst modes: Replay options (2) and (3) above, but this time substitute “UIKit” for “SwiftUI.”
I’ve outlined the different modes because many of the issues I’ve run into only affect one of them: SwiftUI code that uses Mac Catalyst to run on the Mac in “optimize for Mac” mode. You’d think that this would be the easiest way for an iOS Engineer to write apps that look like native Mac apps, but beware these sharp edges.
Bug: .borderedProminent doesn’t work in “optimize for Mac”
Mac “push buttons” have borders. According to the Human Interface Guidelines, you should use a filled button for the primary action in a view. SwiftUI provides an easy way to get this: Apply the .borderedProminent style.
The problem? This works for SwiftUI-targeting-iOS apps, and SwiftUI-targeting-Mac apps, and SwiftUI-targeting-Catalyst-in-iOS-mode apps, but not SwiftUI-targeting-Catalyst-in-optimized-mode apps. For just that mode, the button doesn’t get filled in.
This seems to be a SwiftUI bug and not a Catalyst bug. If you write UIKit code, and create a UIButton and use UIButton.Configuration.borderedProminent() to create a button configuration, you’ll get a button that shows up in your “optimize for Mac” Catalyst app appropriately filled in.
That, then, is the workaround for this bug. If you’re writing a Mac app, using Mac Catalyst, choose “optimize for Mac” for your UI mode, you cannot use the SwiftUI Button View for any button you want to display in the prominent “filled” style. Instead, you need to use UIViewRepresentable to create a UIButton and explicitly give it the UIButton.Configuration.borderedProminent() configuration.
Bug: Toolbars clip their toolbar buttons
Update: This was a bug in MacOS Ventura that was fixed in Beta 6.
This is another one that appears to be SwiftUI + Mac Catalyst + “optimize for Mac” specific. In this mode, the toolbar clips its buttons. Instead of this:
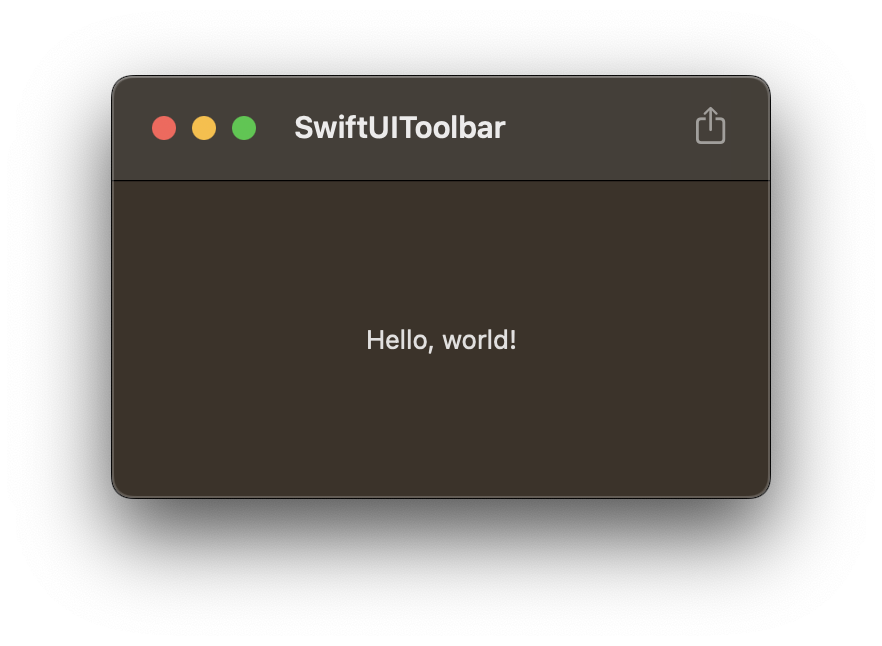
you get this:
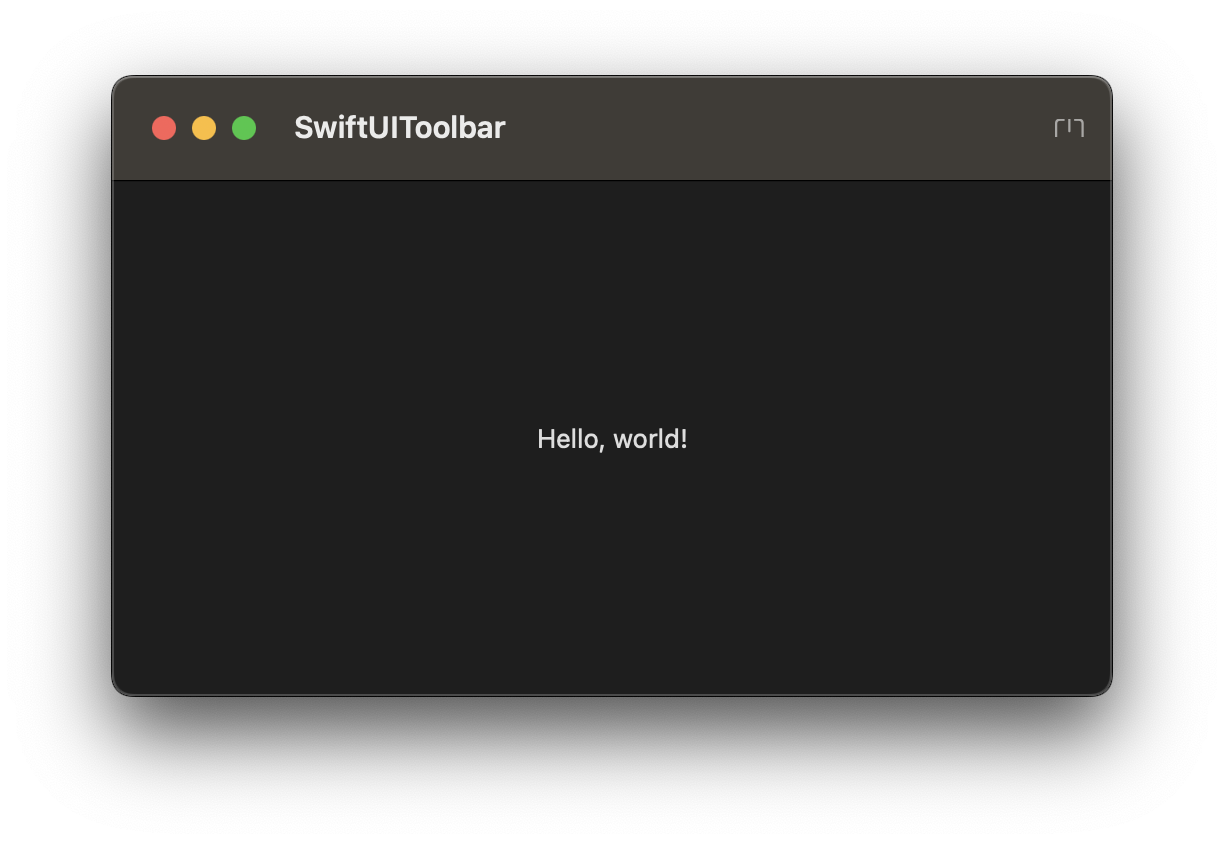
Note that the top & bottom of the toolbar icon are clipped.
While I haven’t coded this yet, I suspect the answer is going to be the same as above: Use UIKit to manage your toolbars if you want a Mac-style toolbar in your Catalyst app.